IndyMill Build Guide: The Open-Source Vertical Mill That Cuts Aluminum Better Than a Router
Nikodem Bartnik, a Polish engineer and YouTuber, did something quietly radical: he designed a vertical mill from scratch, published it open-source, and filmed the entire build process in a YouTube series. The result is the IndyMill—a machine that doesn't pretend to be a router, doesn't compromise on
Table of Contents
- The IndyMill Design Philosophy
- Build Documentation: YouTube as Primary Source
- Specifications & Reality
- Why NEMA23 is Non-Negotiable
- Building the Column: Steel or 3D Print?
- Spindle Selection
- Software & Control
- Accuracy Expectations
- The Community & Resources
- When to Choose IndyMill Over PrintNC
- When PrintNC is Better
- Verdict
- Shop This Guide
- Related Articles
Nikodem Bartnik, a Polish engineer and YouTuber, did something quietly radical: he designed a vertical mill from scratch, published it open-source, and filmed the entire build process in a YouTube series. The result is the IndyMill—a machine that doesn't pretend to be a router, doesn't compromise on Z-axis rigidity, and actually delivers the milling workflow that aluminum hobbyists crave.
The distinction matters. A gantry router (like PrintNC) hangs the tool over the work. A vertical mill (like IndyMill) mounts the tool on a rigid column above the work. That column is the defining feature. It means Z-axis deflection drops to single-digit microns, surface finishes improve, and you can apply actual cutting forces without the machine flexing. If you've ever used an MPCNC on aluminum and thought "this feels squishy," a column-based mill shows you why.
The IndyMill Design Philosophy
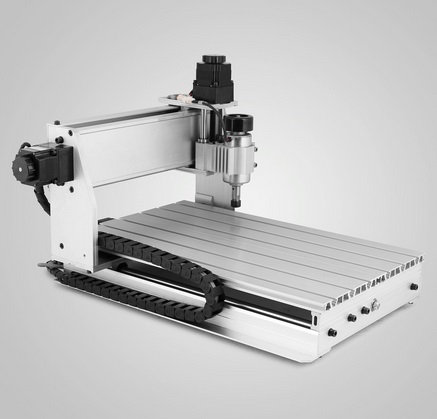
IndyMill is a vertical mill column design: a welded or bolted steel column houses the Z-axis ballscrew and carriage. The X-Y table below holds the work. MGN linear rails run all three axes. NEMA23 motors drive all three. The spindle is mounted on the Z carriage and moves vertically; the table stays fixed unless you move it manually.
This is fundamentally different from PrintNC or MPCNC:
- Z-axis: column-mounted = massively stiffer than a gantry-mounted tool
- Workflow: you adjust cutting depth by jogging Z; you move work on the XY table
- Spindle: vertical orientation makes coolant/chip evacuation easier
- Work holding: the mill structure is centered, not hanging—you can actually apply leverage
The design draws from real mill geometry but uses 3D-printed components (nylon mostly) for non-critical parts and ballscrews instead of Acme screws. It's genuinely innovative: open-source, completely documented, and built by hundreds of people globally.
Build Documentation: YouTube as Primary Source
Here's the catch: Nikodem's YouTube channel IS the primary documentation. He has a complete series showing the build from plasma-cut steel parts through software setup. Written plans exist (Printables, GitHub), but the video series is where clarity lives.
This means:
- Pro: you can watch exactly what he did, see assembly challenges in real time, understand design intent
- Con: you're learning from video, not reference documents; you need to watch and take notes or pause frequently
Many builders print out the plans and use them as checklists while following the video series. The combination works well. The IndyMill community on Discord and Reddit is also responsive—people have shown what they're building, so questions get specific answers.
Specifications & Reality
| Aspect | IndyMill | PrintNC (for comparison) |
|---|---|---|
| Work Area | ~220×160mm XY | ~300–700mm (build-dependent) |
| Z Clearance | ~100mm | 80–120mm (build-dependent) |
| Column Height | Steel tube, 180–200mm | N/A (gantry design) |
| Linear Rails | MGN15 (XY typical) | MGN12–15 mix |
| Ballscrews | All three axes RM1605 or RM1204 | All three axes typical |
| Motors | NEMA23 all axes (required for rigidity) | NEMA23 typical |
| Spindle | 800W–1.5kW (vertical mount) | 800W–2.2kW (any orientation) |
| 3D Printed Parts | Yes (nylon, critical components) | Yes (mostly convenience parts) |
| Build Cost | $600–1,200 | $800–1,500 |
| Assembly Time | 80–120 hours | 100–150 hours |
| Z-Axis Stiffness | Excellent (column design) | Good (gantry design) |
| Best For | Aluminum milling, precision parts, PCB work | Aluminum + larger work area |
What the specs mean: IndyMill's smaller XY footprint is deliberate. You're optimizing for precision and rigidity, not work area. The column design is where IndyMill wins. PrintNC wins if you need reach.
Why NEMA23 is Non-Negotiable
IndyMill requires NEMA23 motors on all three axes. This isn't flexible. The cutting forces on a vertical mill are applied directly to the ballscrews without the mechanical advantage of a gantry. NEMA17 will stall, lose position, and ruin parts. Don't cheap out here.
Cost: $35–50 per motor from AliExpress (StepperOnline) or $60–80 from Amazon. NEMA23 is the baseline. Budget accordingly.
Building the Column: Steel or 3D Print?
The column can be welded steel (stronger, cleaner aesthetics) or bolted structural steel (easier for home builders without welding). The design accommodates both. 3D-printed parts are typically nylon brackets for rail mounting—precision-critical but non-structural.
Most community builders recommend:
- If you can weld: Nikodem welds his column—looks professional, saves weight
- If you can't: bolted angle iron or box tube works fine; slightly heavier, same rigidity
- If you're unsure: several builders sell pre-fabricated columns on Etsy or Fiverr—spend $150–200 to skip fabrication, not the worst trade
Spindle Selection
IndyMill community standards:
- 800W ceramic-bearing spindle (VFD-driven, water-cooled) = ideal, ~$100–150, runs on 110V/220V
- Dremel or rotary tool = possible for very light cuts, but undersized
- Router = technically works, but you're overcomplicating Z-axis loading
The vertical spindle orientation is actually an advantage: gravity helps pull chips down and away, coolant flows naturally. Water cooling is optional but recommended for continuous aluminum work.
Software & Control
IndyMill builders use:
- FluidNC/GRBL (most common): open-source, excellent community support, 3-axis standard
- Mach3 (some builders): proprietary, steeper learning curve, unnecessary for a machine this size
- LinuxCNC (niche): powerful but complex
The firmware choice doesn't matter much if you pick GRBL/FluidNC. Board options:
- ESP32-based: cheap (~$15–30), reliable, community-proven
- Arduino + CNC Shield: older, still works fine
- Chinese off-brands: avoid; quality is spotty
Budget $50–80 for a solid controller setup. Don't cheap out.
Accuracy Expectations
A properly tuned IndyMill:
- Repeatability: ±0.1mm easily, ±0.05mm achievable with care
- Surface finish: aluminum mills at 2,000–4,000 RPM with proper feeds produce near-polish finishes
- Cut speed: aluminum ~150–250 mm/min depending on depth, tool diameter, RPM
These numbers are real. An MPCNC cannot reliably hit ±0.05mm repeatability—the physics don't support it. PrintNC can, but at larger scale. IndyMill hits this in a tight, precise package.
The Community & Resources
- Nikodem's YouTube channel: the source
- Printables.com: search "IndyMill" for complete files
- GitHub: several IndyMill repos with BOM spreadsheets and 3D models
- Reddit r/CNC: active IndyMill builders willing to troubleshoot
- Discord: smaller but responsive IndyMill channels
The community is real but smaller than PrintNC or MPCNC. That's not a weakness; it means everyone knows the design well and can help with specifics.
When to Choose IndyMill Over PrintNC
- You primarily mill aluminum: column Z-axis is dramatically stiffer
- Work area under 220×160mm is acceptable: smaller is actually better here
- You want a mill workflow, not a router workflow: the XY table and vertical spindle feel like a real mill
- You're comfortable learning from video + community: no formal manual
- You want precision over capacity: repeatability and surface finish matter more than work envelope
When PrintNC is Better
- You need work area larger than 220×160mm: PrintNC scales to 700×700mm easily
- You want structured step-by-step documentation: PrintNC Discord is active but PrintNC's design is more "documented by use"
- You might want to upgrade to larger cutting: PrintNC's ceiling is higher
- Faster XY travel matters: MPCNC and PrintNC move XY faster due to lower moving mass on Z
Verdict
IndyMill is the best precision aluminum mill for hobbyists if your work fits in 220×160mm. The column design is fundamentally superior to gantry designs for Z stiffness. Documentation is YouTube-primary, which is either seamless or friction depending on your learning style. Cost is comparable to PrintNC; build time is similar. The community is smaller but responsive.
This is not an entry-level machine—you need to be comfortable welding or sourcing fabricated parts, tuning ballscrews, and learning from video. But if you want precision milling (not just routing) and you want it at hobbyist cost, IndyMill is the answer.
Build this if you're serious about aluminum precision work. Skip it if you need a large work area or prefer written documentation over video guides.
Shop This Guide
| Component | Source | Notes |
|---|---|---|
| IndyMill Plans | Printables.com (search: IndyMill) → | Free, includes all 3D print files and dimensions |
| MGN15 Rail Sets | AliExpress: MGN15 200–250mm → | C0 preload, you'll need 3× rails + 6× blocks |
| Ballscrews (RM1605) | AliExpress: RM1605 200–250mm → | Matched set of 3 typical; budget ~$80–100 |
| NEMA23 Motors | Amazon: StepperOnline NEMA23 → | 2–3Nm, 4× motors required, ~$40–80 each |
| 800W Spindle (VFD) | Vevor → | Water-cooled ceramic bearing, ~$120–150 |
| Steel Tube (Column) | Local steel supplier | 25×25mm or 30×30mm 0.065" wall, ~2–3 meters |
| Nylon 3D Filament | Amazon: Nylon Filament → | 1–2kg typical for all brackets; print on heated bed |
| FluidNC Controller | AliExpress: ESP32 CNC Board → | ~$30–50, includes stepper drivers and spindle output |